How to add Reviewee reviews to your Next.js website
You’ve collected your first client reviews in Reviewee. Now you want them on your website, where people deciding whether to hire you will actually see them. This guide covers every step for a Next.js site, from approving a review to seeing it live, with a screenshot for each one.
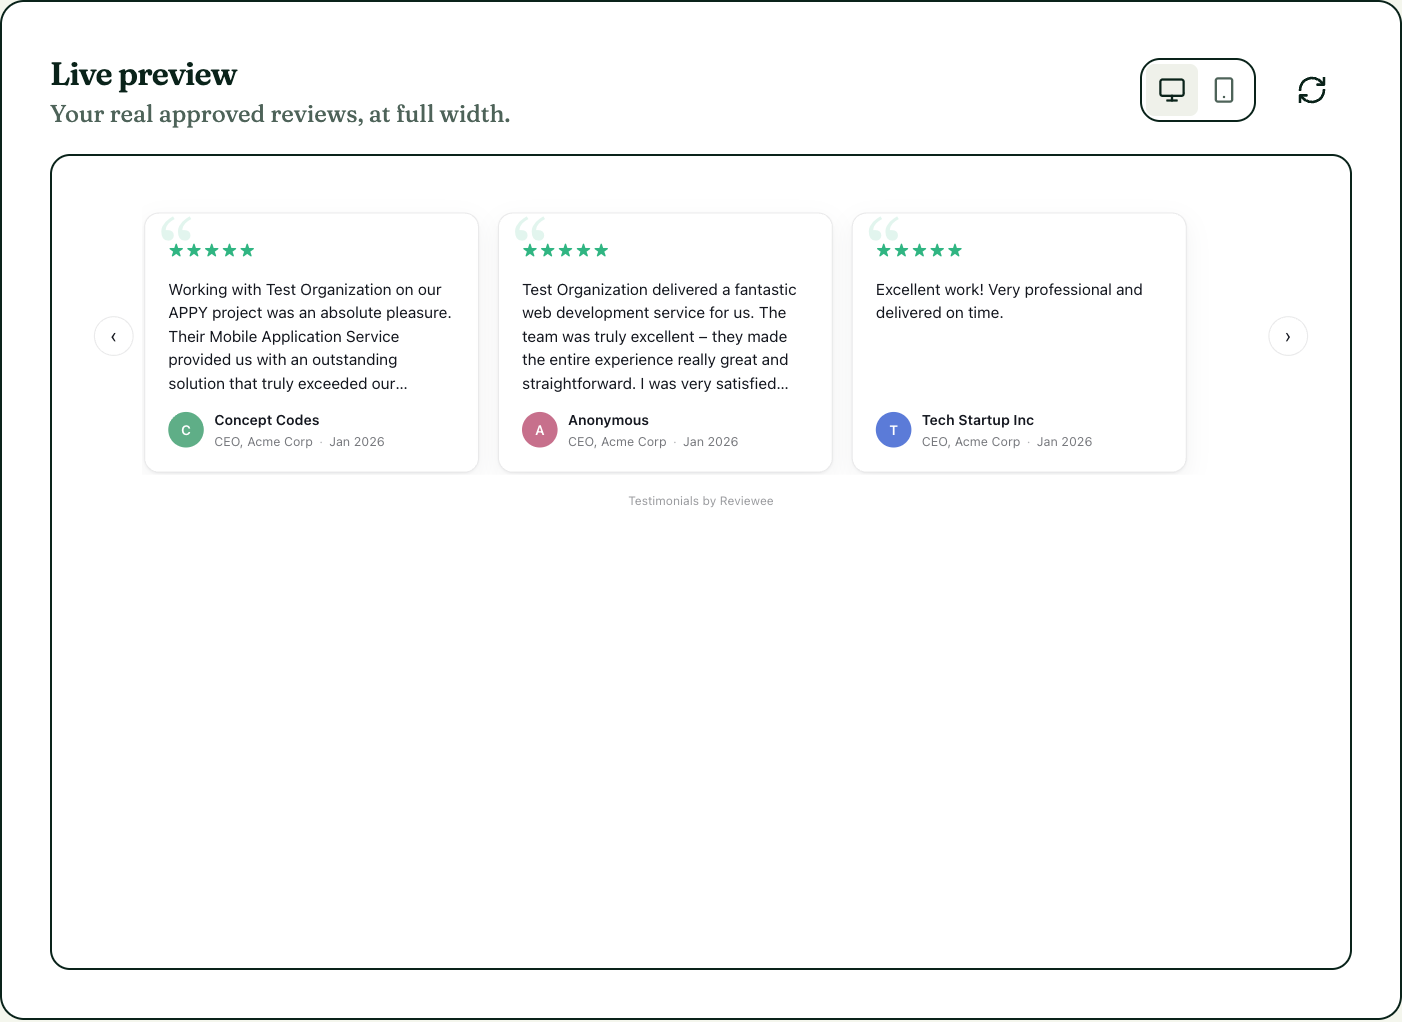
By the end you’ll have a reviews section like this on your site. It updates on its own whenever you approve a new review.
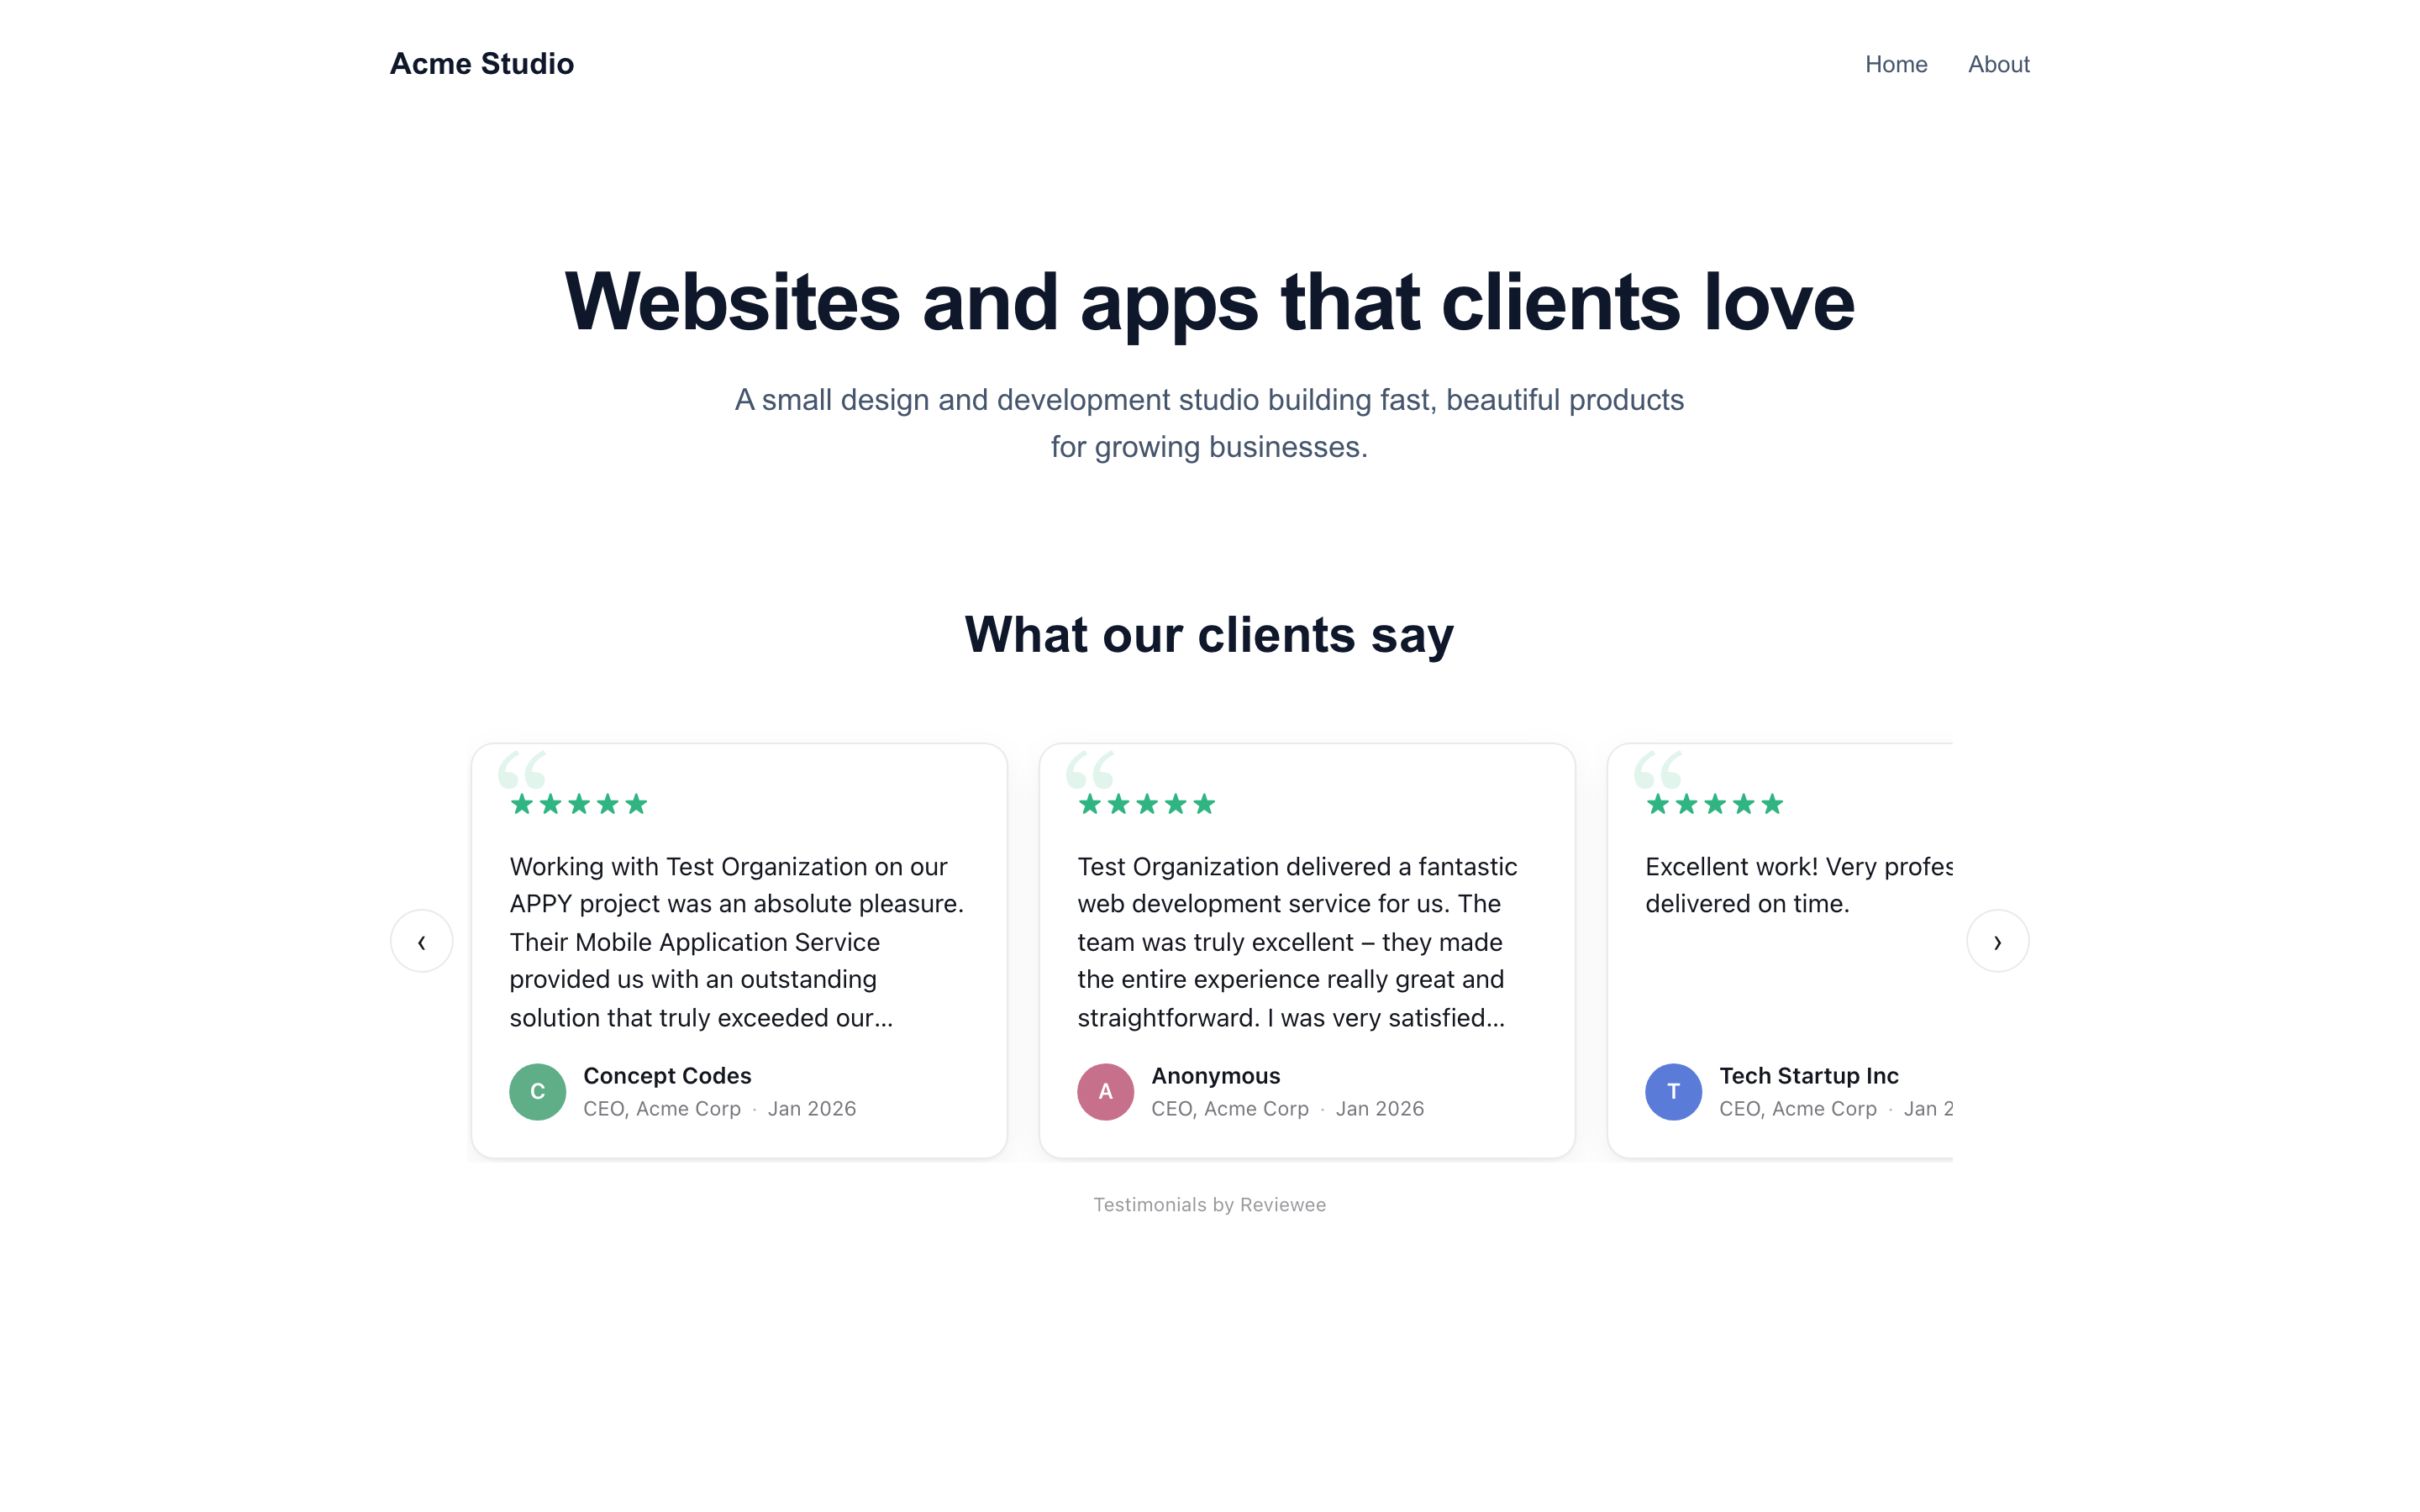
What you need:
- A Reviewee account with at least one client review
- A Next.js website using the App Router (the
app/folder). There’s a note for the Pages Router near the end. - About ten minutes
You don’t need any npm packages, API keys or environment variables.
Step 1: Approve the reviews you want to show
A new review doesn’t appear on your website automatically. You choose which reviews go public, so nothing shows up that you haven’t checked.
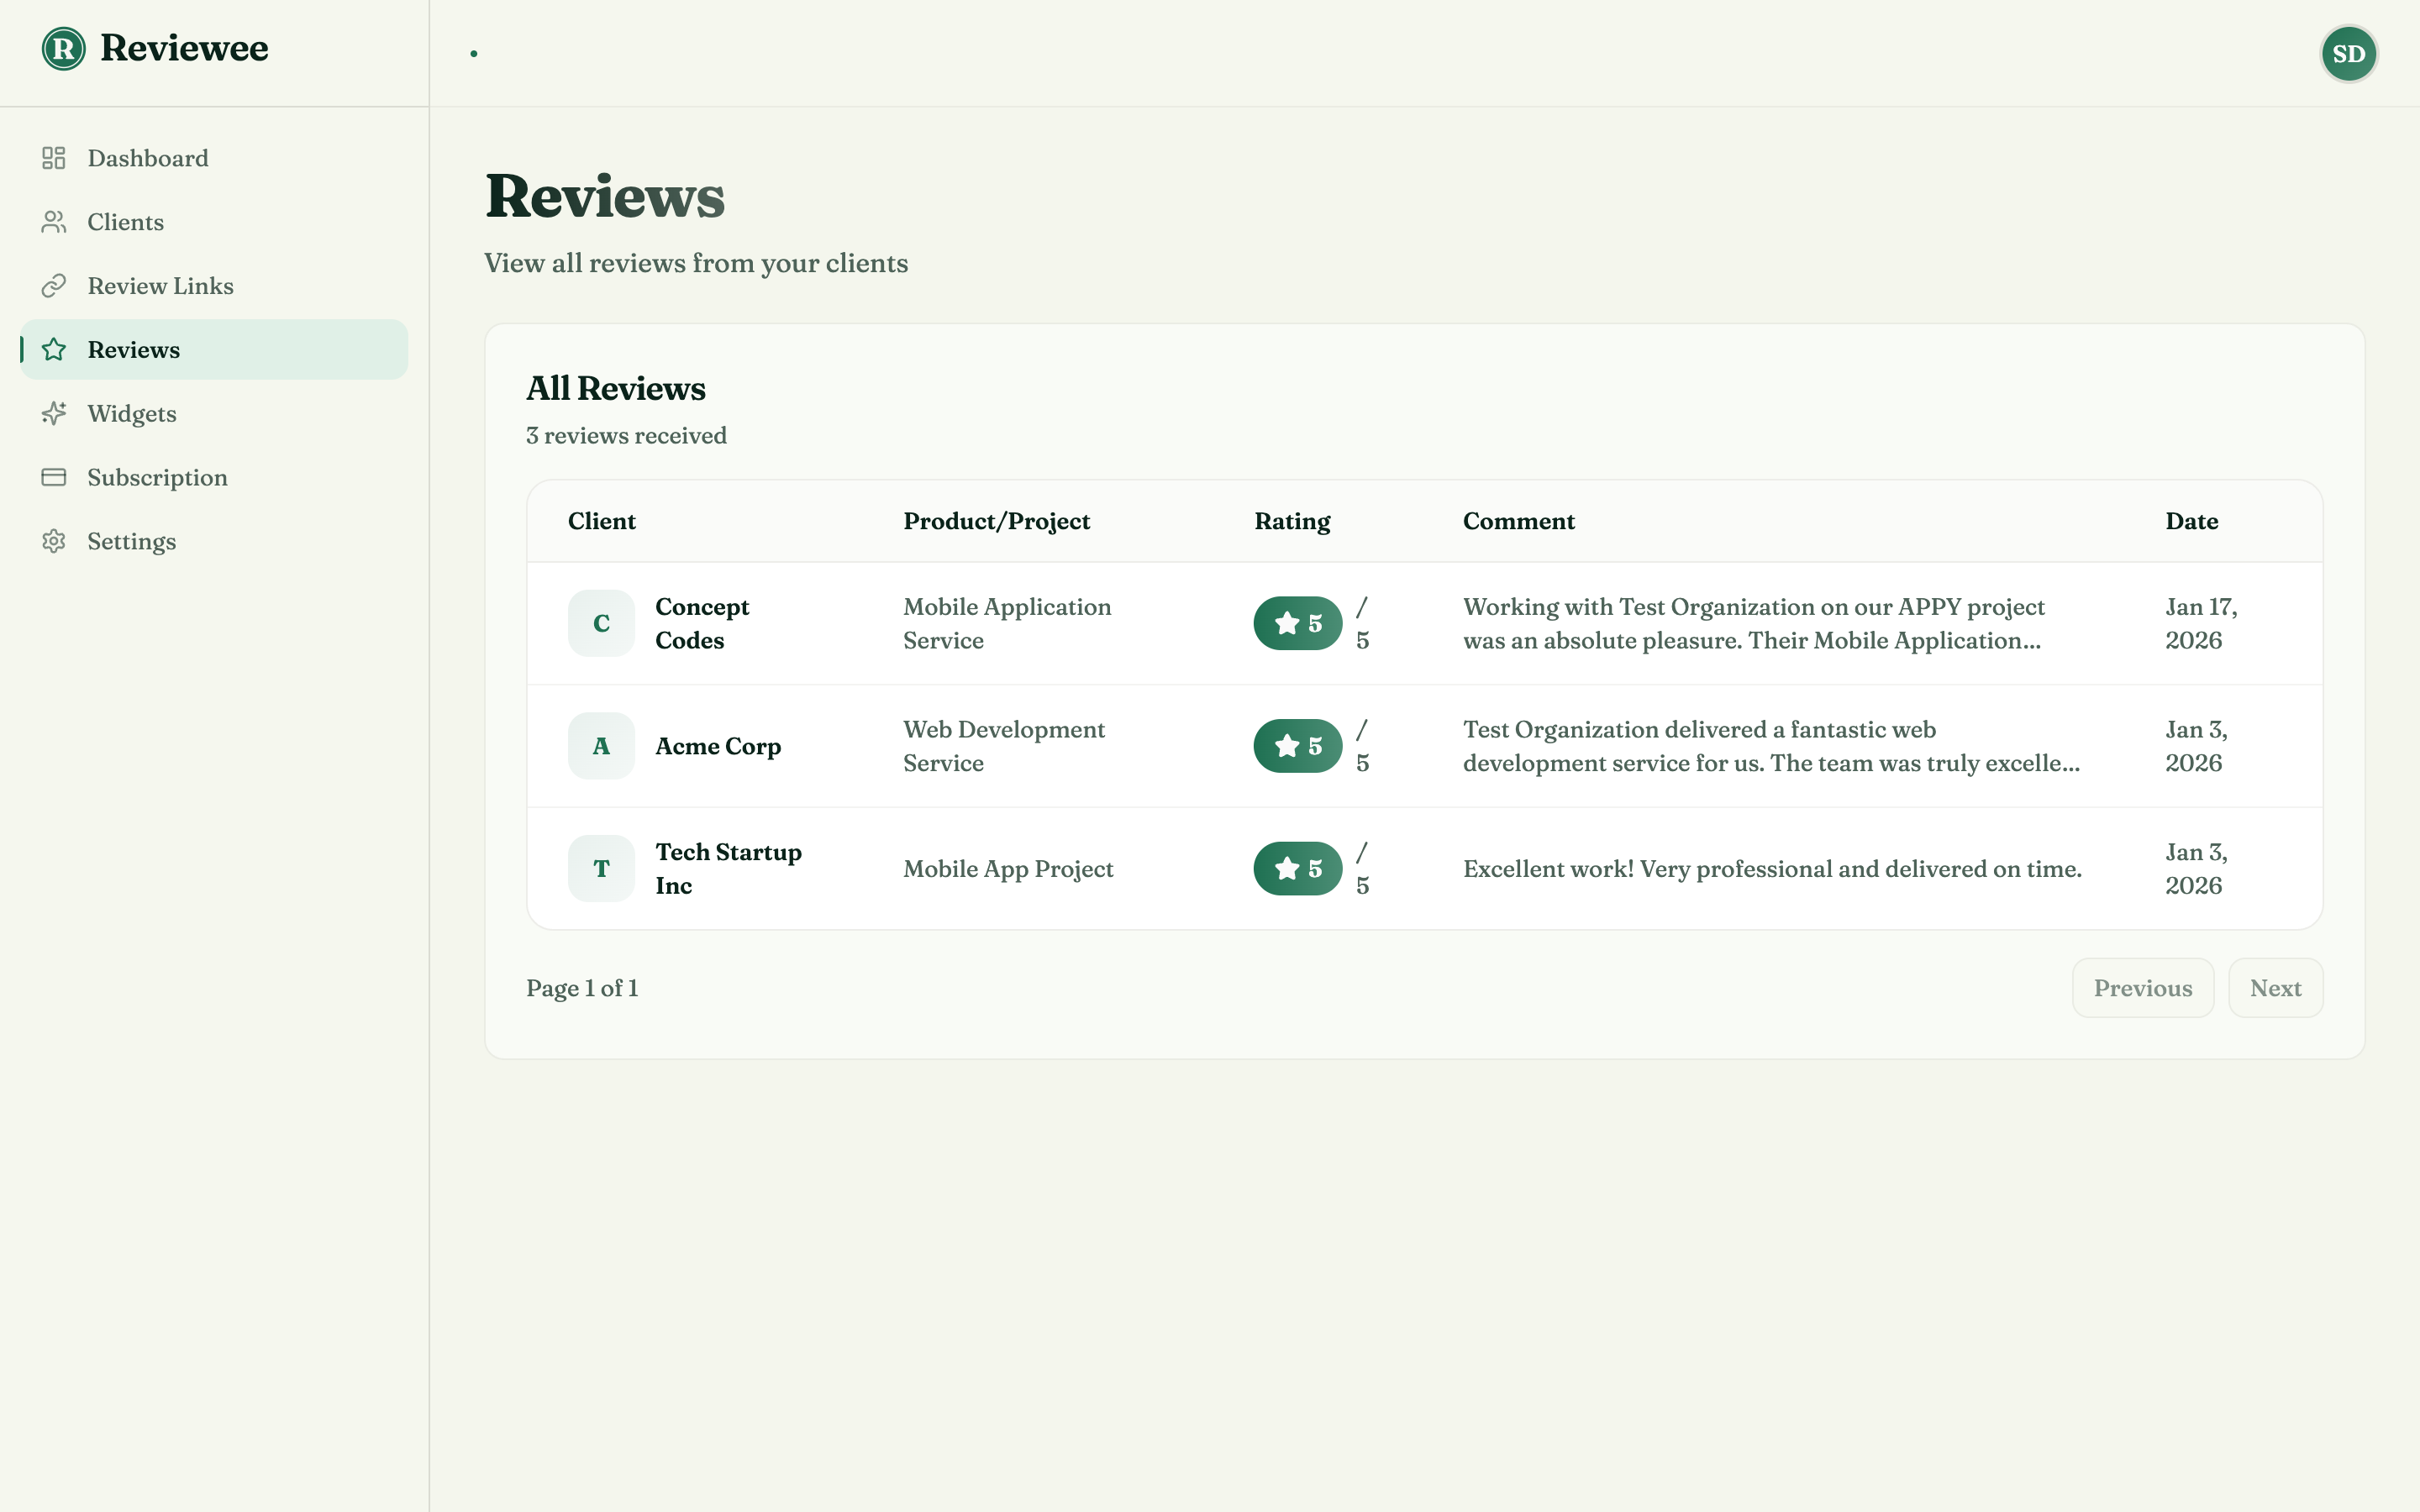
In your dashboard, open Reviews from the sidebar. You’ll see every review your clients have sent you.
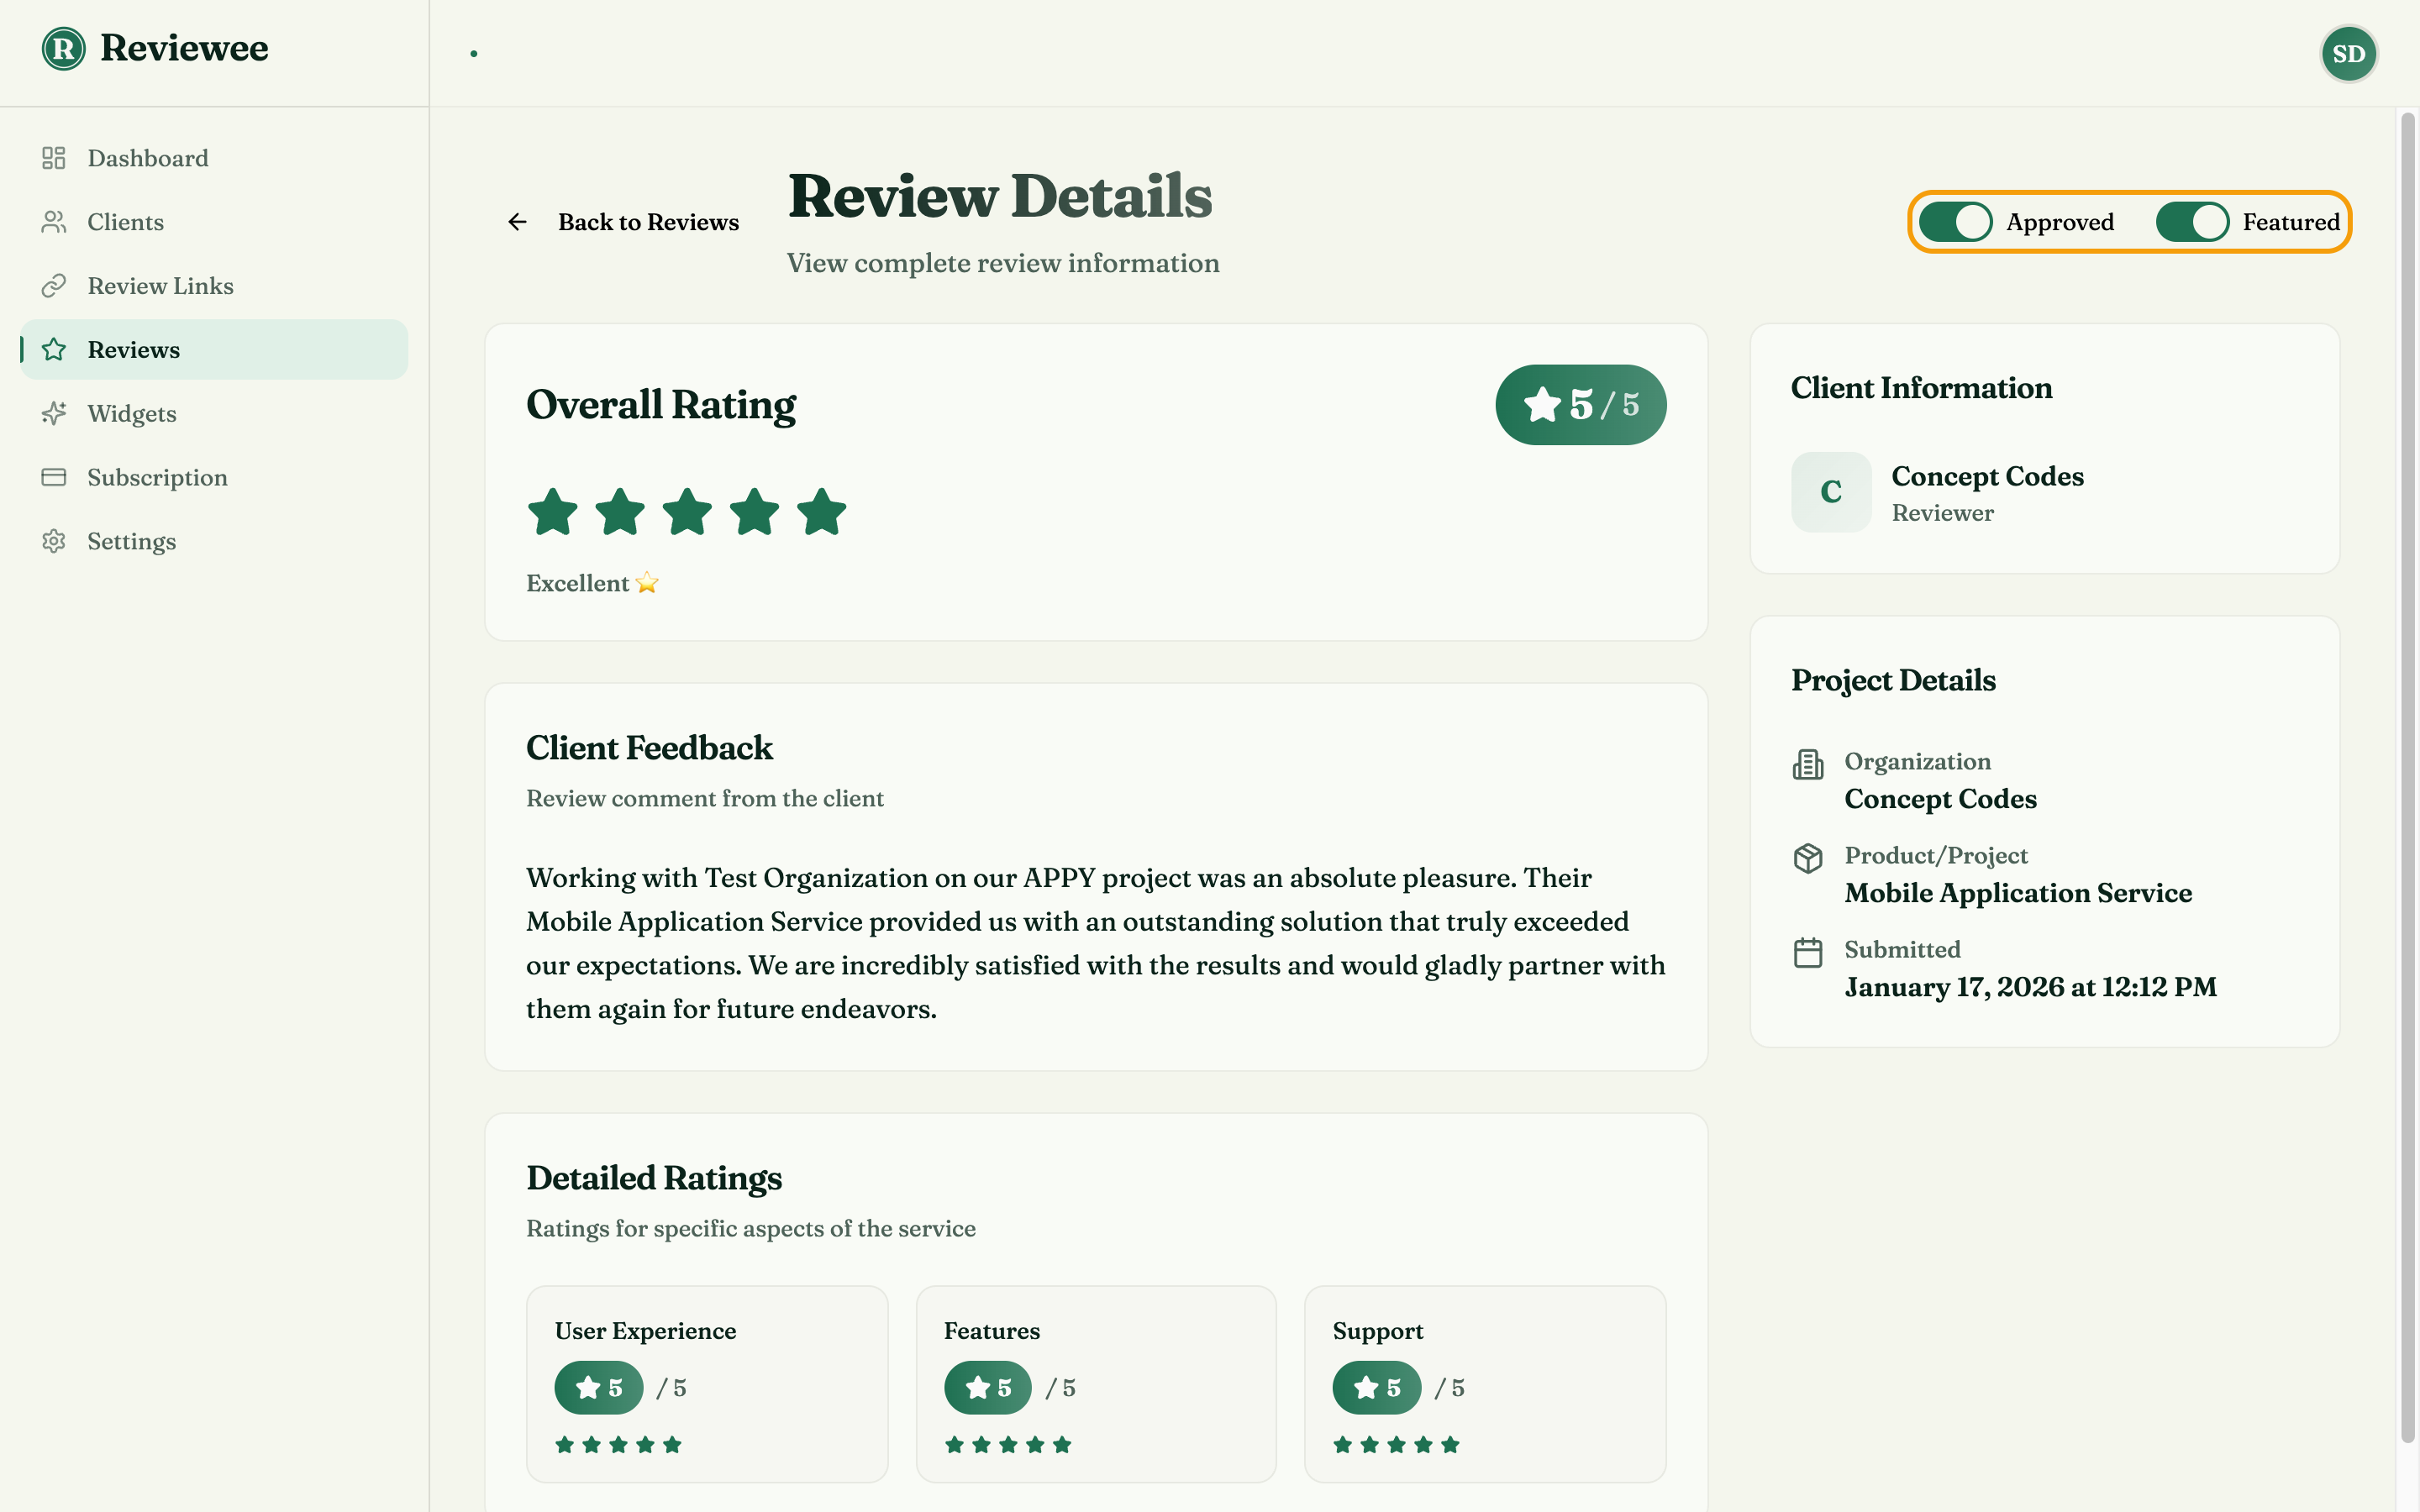
Click a review to open it. In the top-right corner there are two switches:
- Approved: turn this on to allow the review to appear in your widgets. Only approved reviews are ever shown.
- Featured: optional. Marks your best reviews, so a widget can show only those (more on that in step 3).
Step 2: Create a widget
A widget is the box of reviews that appears on your site. You can have several, such as a carousel for your homepage and a single quote for your pricing page, and each one has its own look.
Open Widgets in the sidebar and click New widget. If you already have one, like “My widget” here, you can just edit that one.
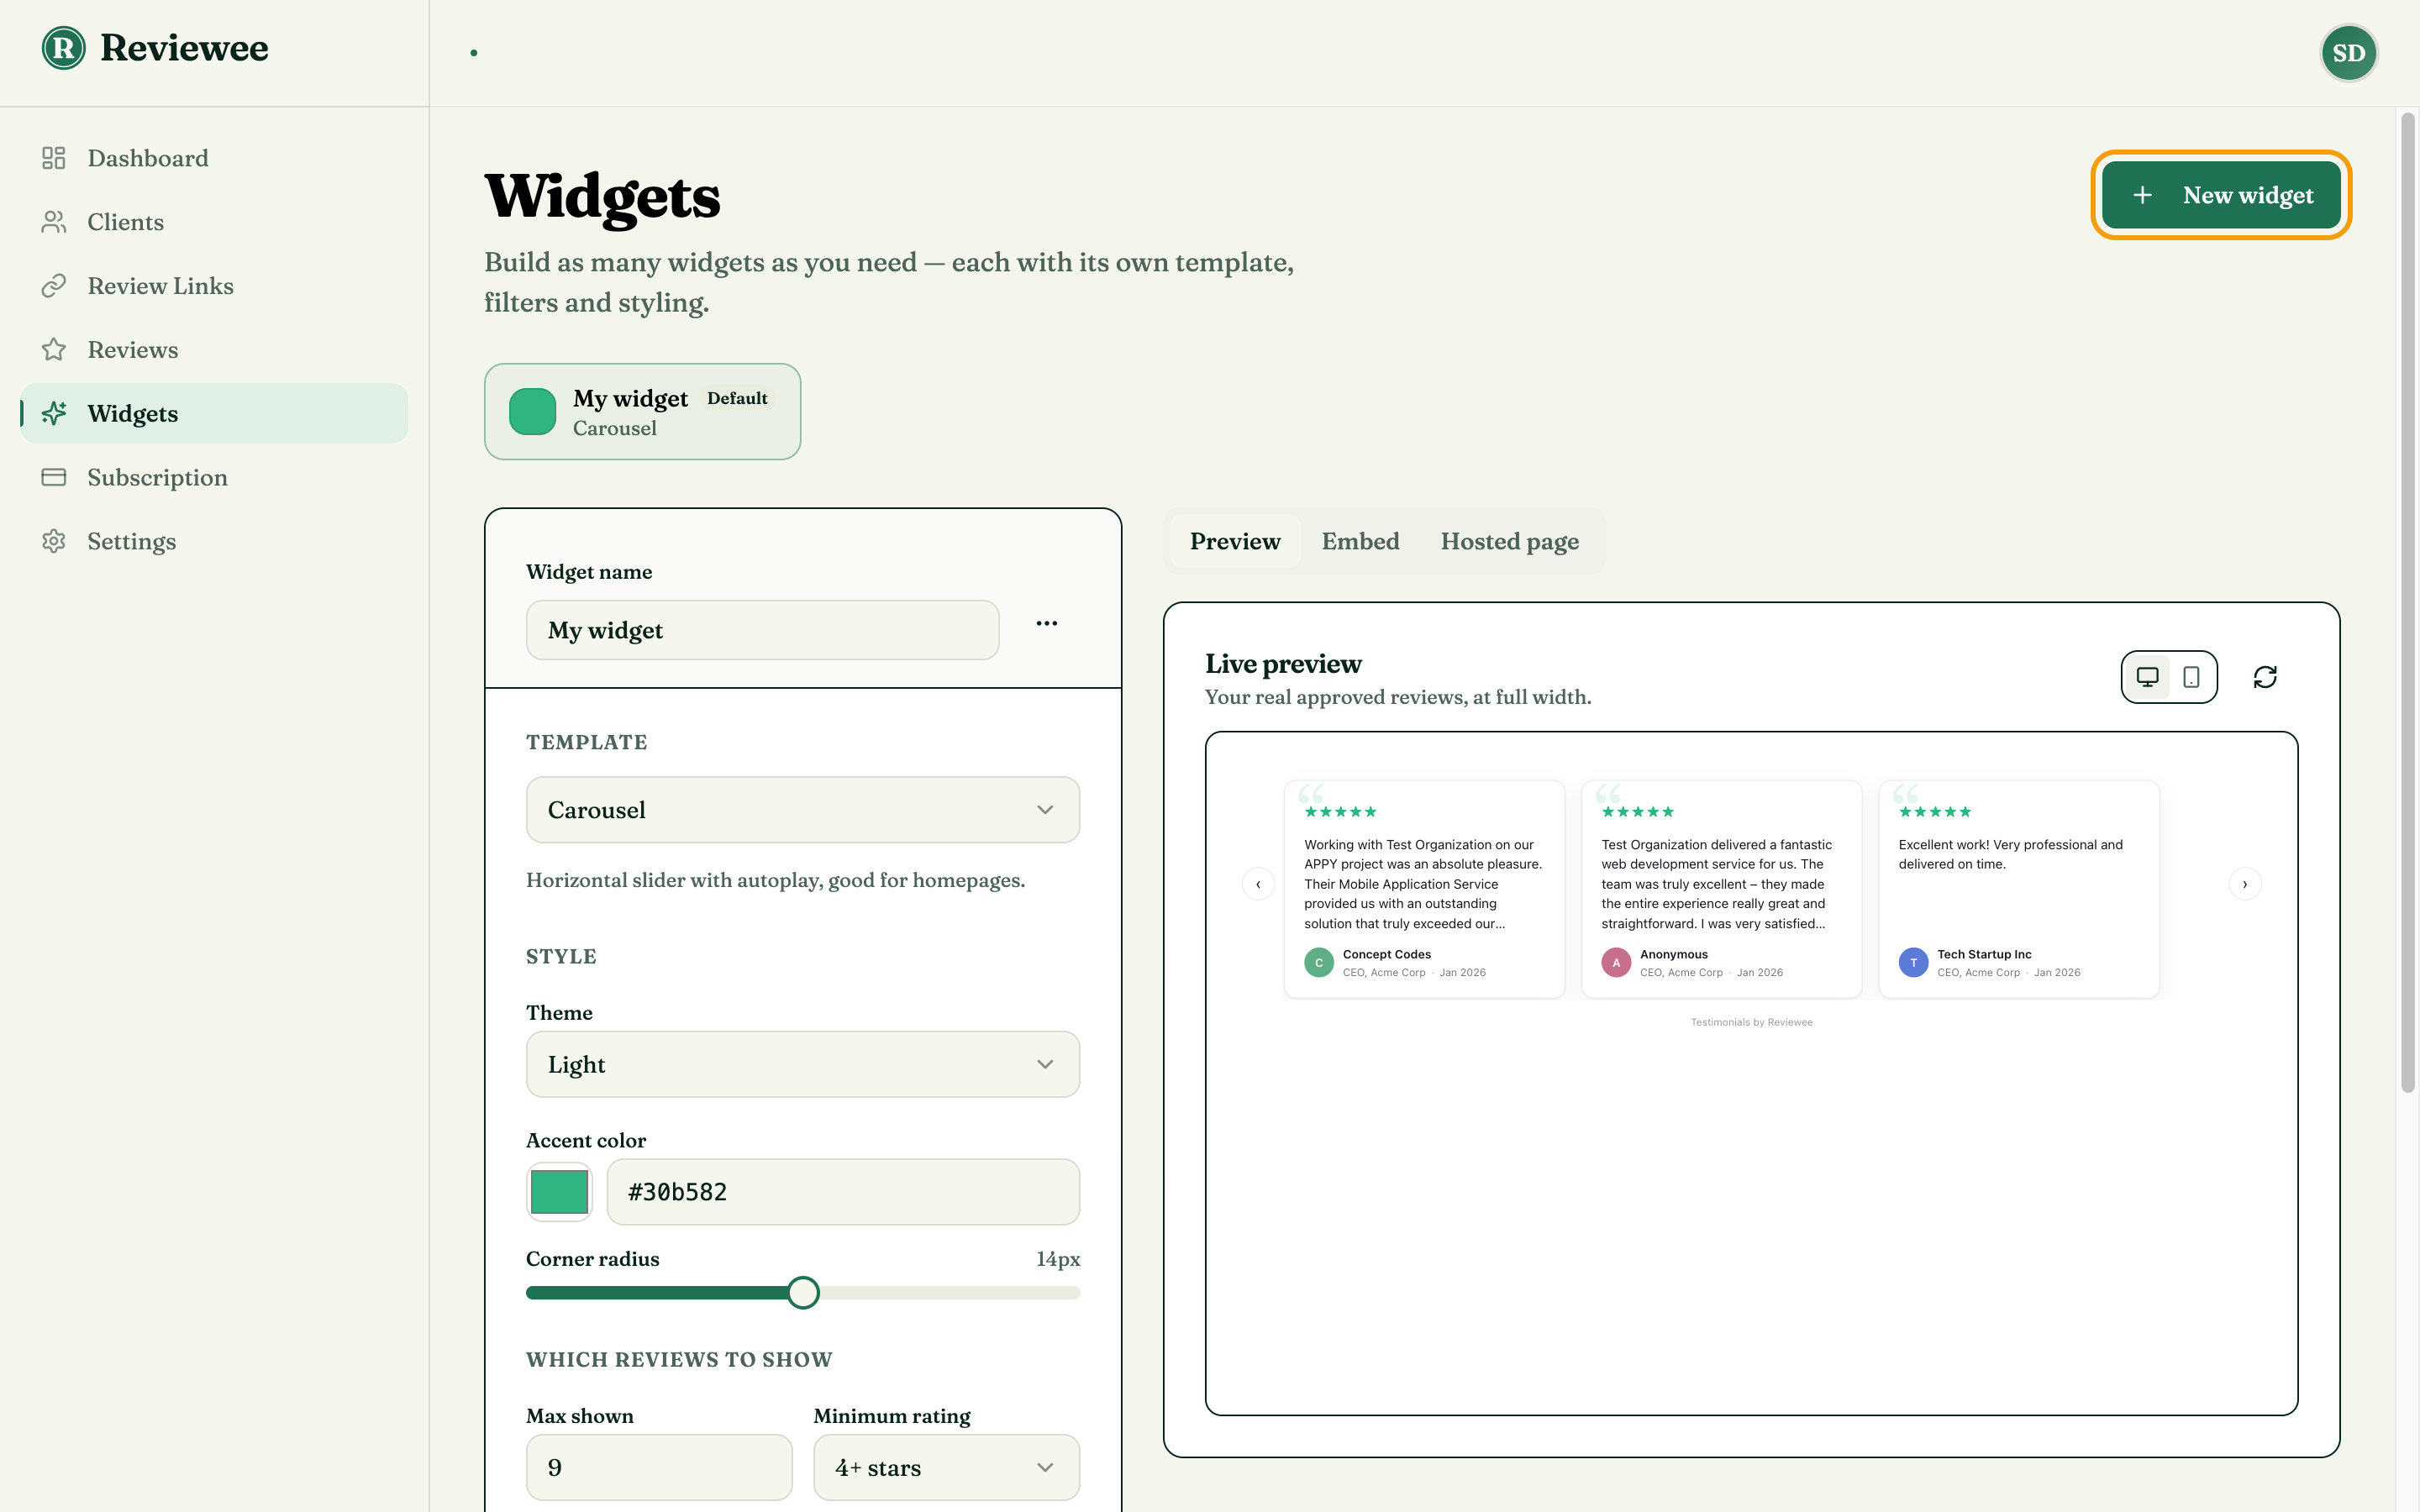
Give the widget a name you’ll recognise, like “Homepage carousel”, and choose a template:
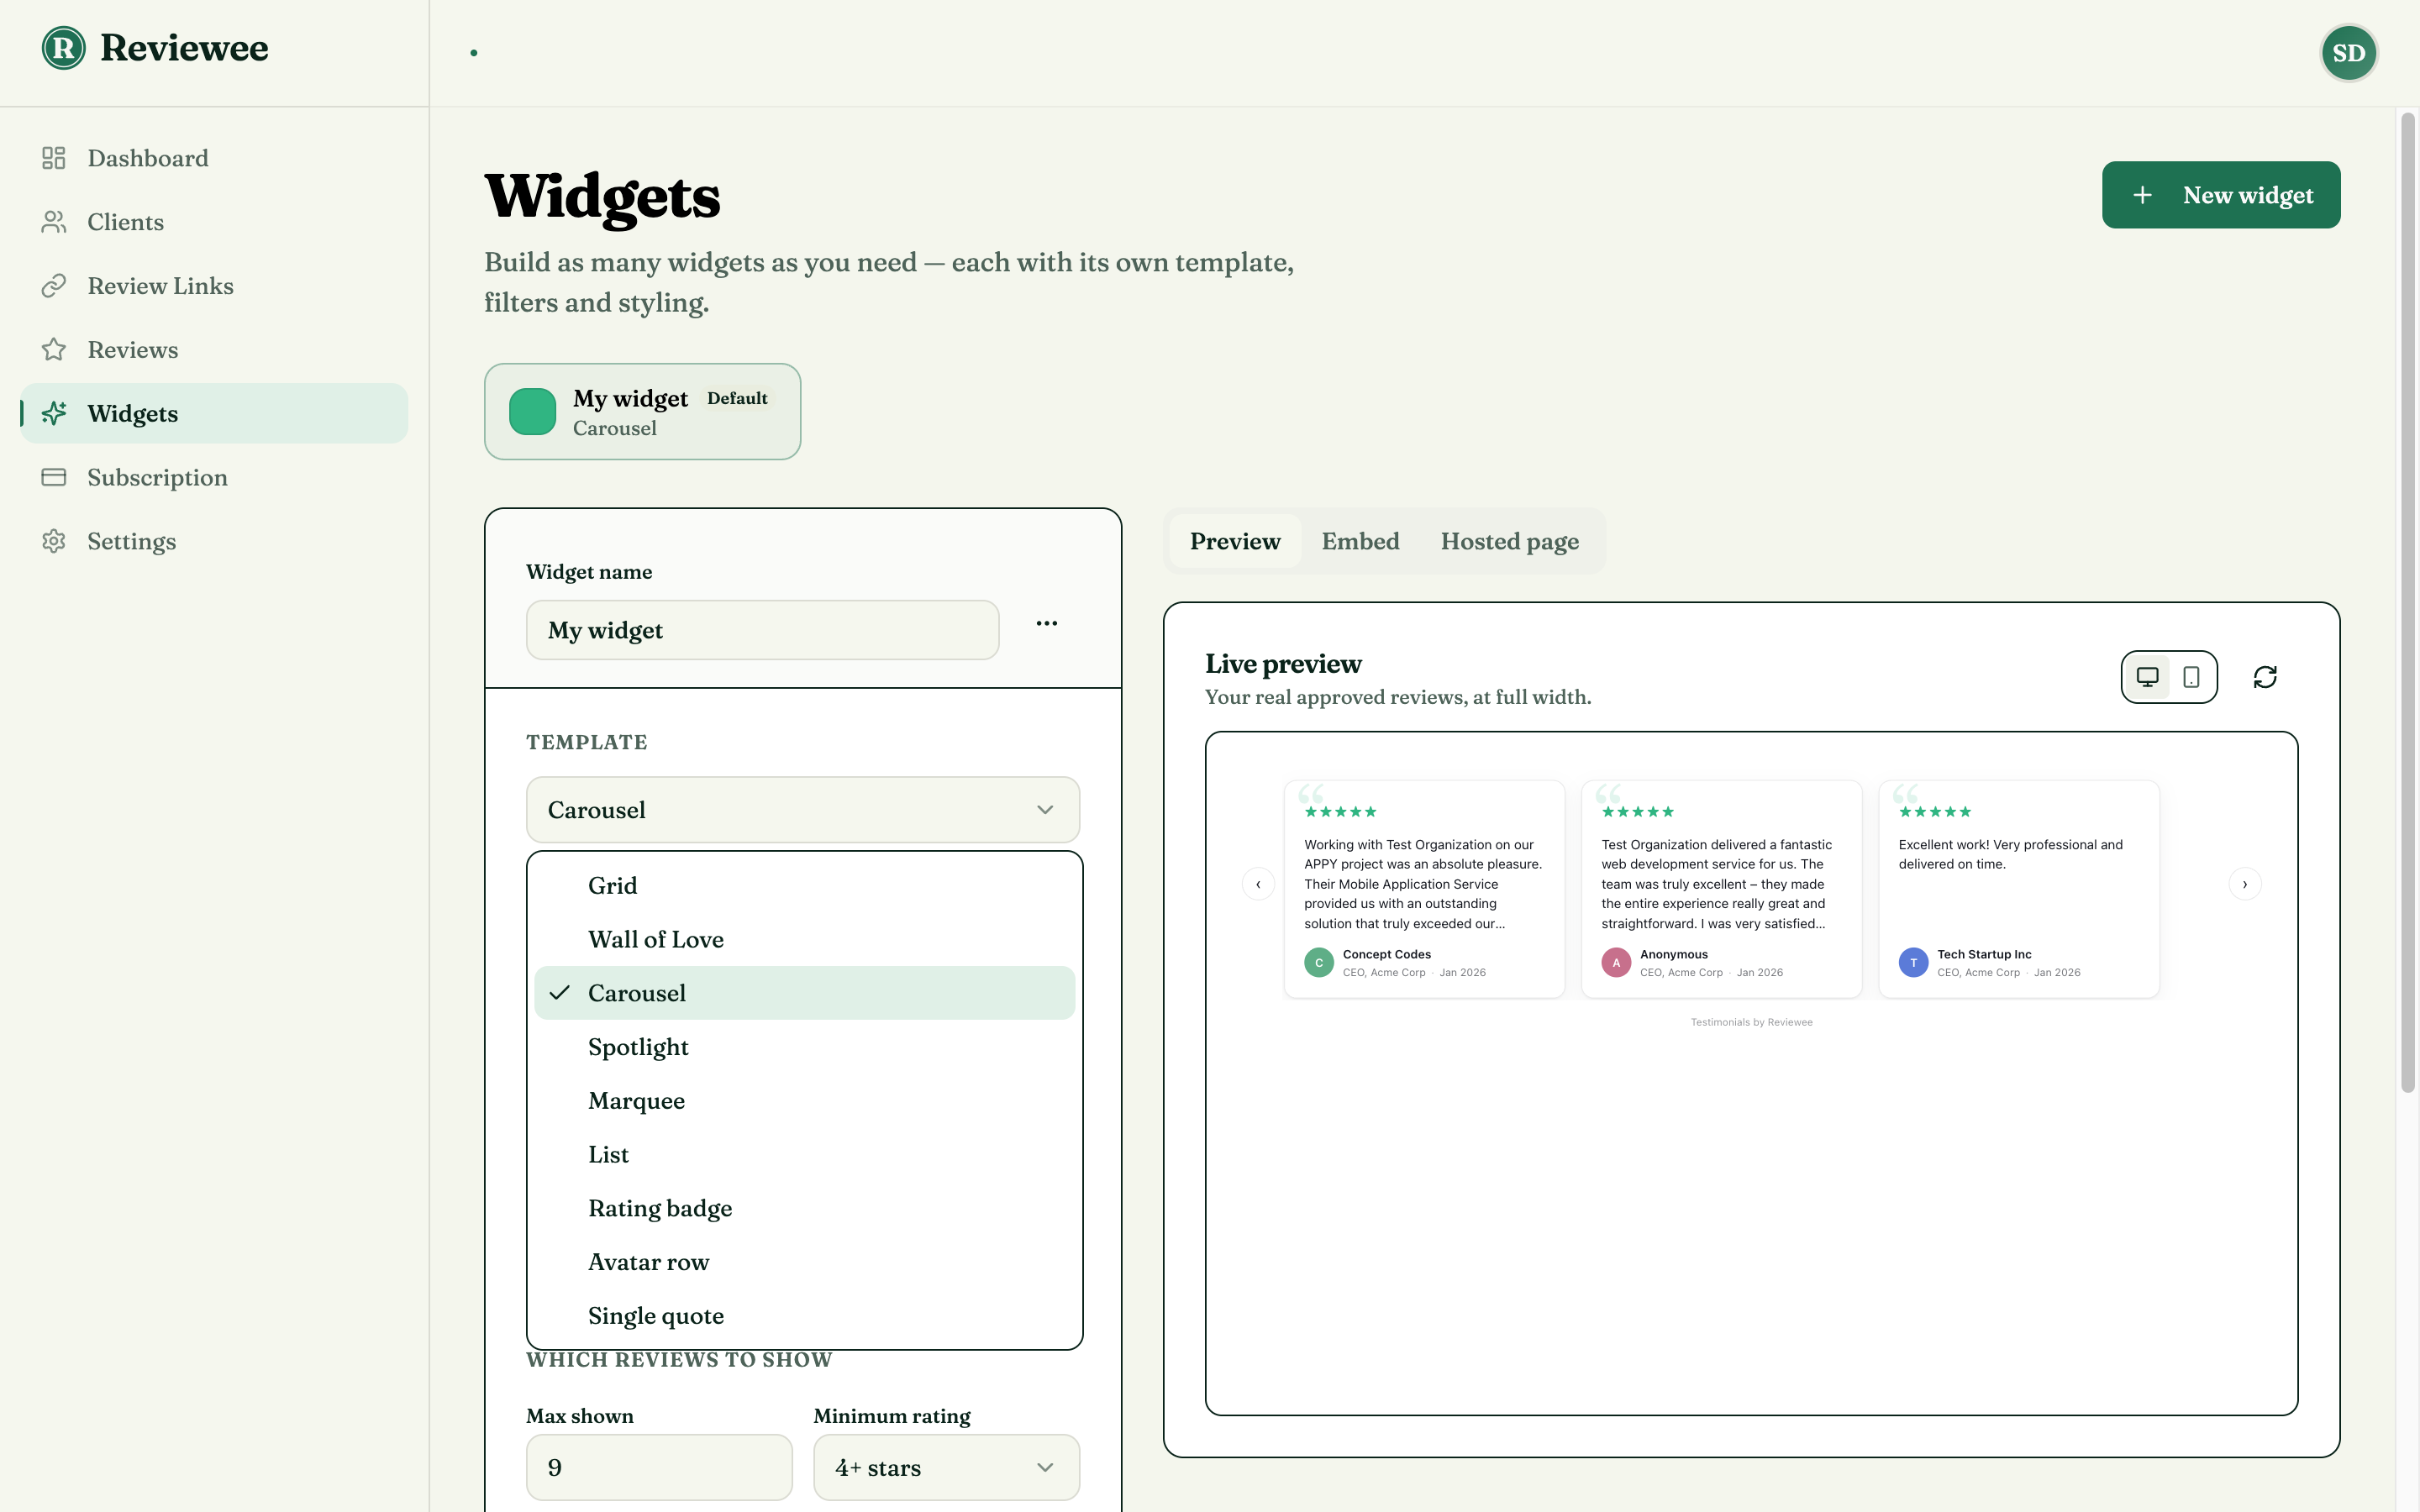
- Carousel or Marquee: a scrolling row, great under a homepage headline
- Grid, Wall of Love or List: a full reviews section
- Spotlight or Single quote: one strong review, e.g. next to your prices
- Rating badge or Avatar row: small enough for a header, footer or contact form
Not sure where each one fits? See where to put client reviews on your website.
Step 3: Style it and pick which reviews to show
The rest of the settings panel controls how the widget looks:
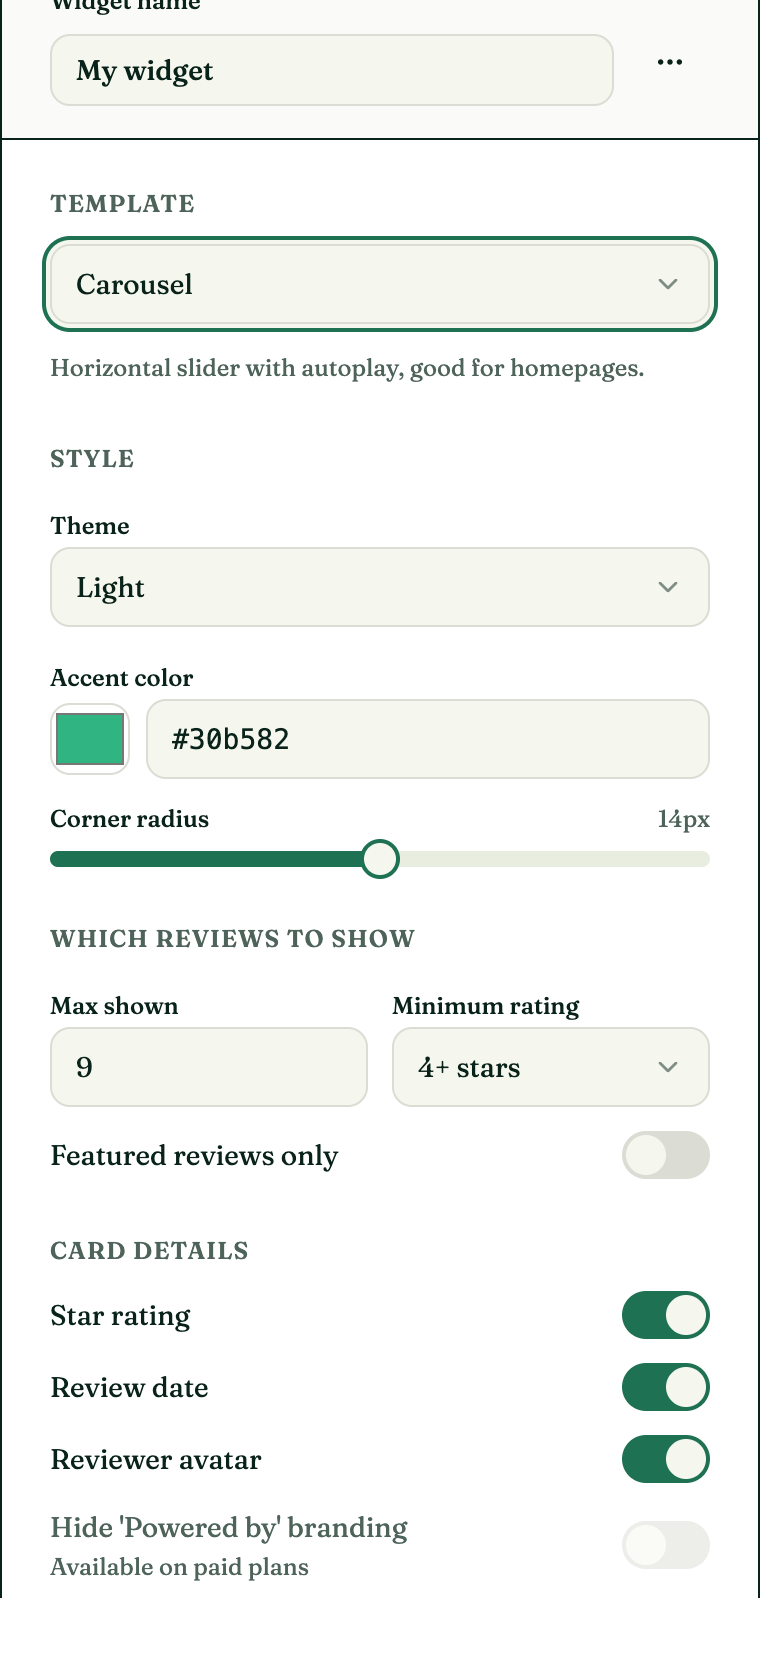
- Theme: Light, Dark, or Auto (matches your site; see the dark mode note below)
- Accent color: use your brand colour so the stars and highlights match your site
- Corner radius: match the rounded corners of the cards and buttons on your site
- Max shown and Minimum rating: for example, show up to 9 reviews with 4 stars or more
- Featured reviews only: only shows reviews you switched to Featured in step 1
- Card details: show or hide the star rating, date and reviewer avatar
Check the Live preview as you go. It uses your real approved reviews, and you can switch between desktop and mobile width. When you’re happy, click Save changes.
Step 4: Copy your Next.js code
Above the preview, click the Embed tab, then the Next.js tab, then Copy.
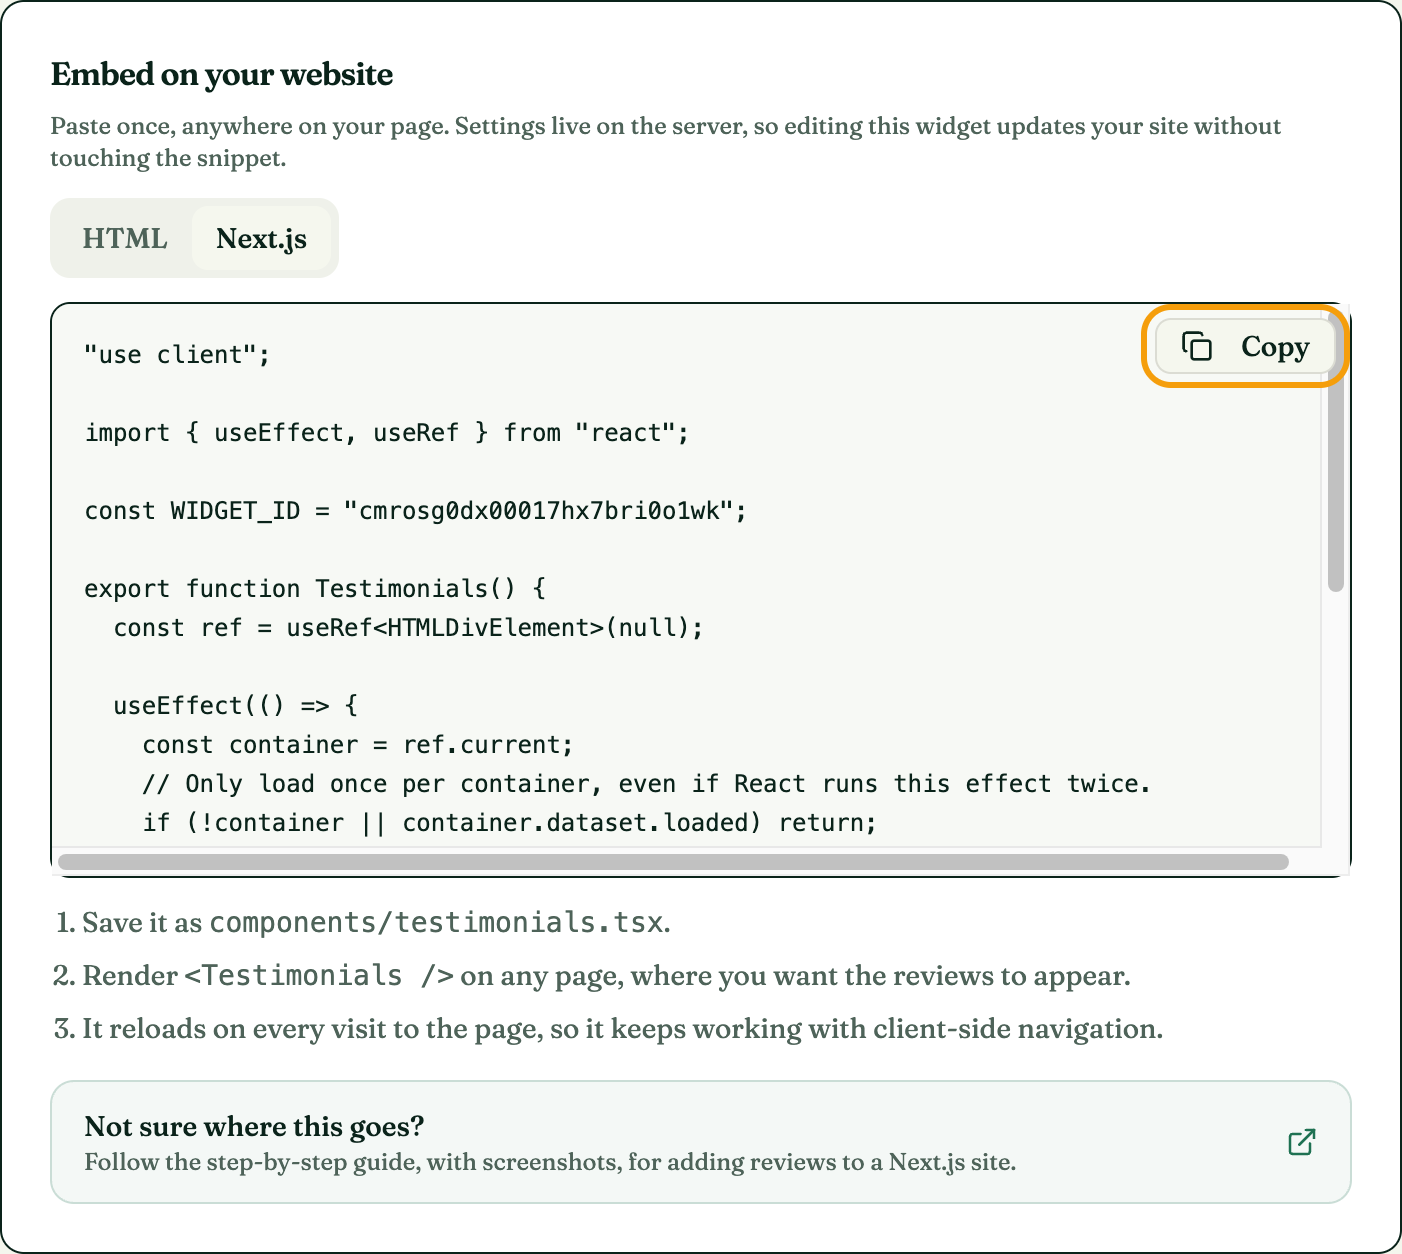
The code you copied looks like this:
"use client";

import { useEffect, useRef } from "react";

const WIDGET_ID = "your-widget-id";

export function Testimonials() {
  const ref = useRef<HTMLDivElement>(null);

  useEffect(() => {
    const container = ref.current;
    // Only load once per container, even if React runs this effect twice.
    if (!container || container.dataset.loaded) return;
    container.dataset.loaded = "true";

    const script = document.createElement("script");
    script.src = "https://reviewee.live/widget.js";
    script.dataset.widget = WIDGET_ID;
    script.async = true;
    document.body.appendChild(script);
  }, []);

  return <div id={`testimonial-widget-${WIDGET_ID}`} ref={ref} />;
}
You don’t need to change anything in it, but here’s what each part does:
"use client"means this component runs in the visitor’s browser, which is where the reviews are loaded.WIDGET_IDtells Reviewee which widget to show. Your copy has your real ID instead ofyour-widget-id.- The
<div>at the bottom marks where the reviews appear on your page. - The
useEffectloads Reviewee’s smallwidget.jsscript, which fills that div with your reviews.
Step 5: Add the file to your project
In your Next.js project, create a components folder at the root, next to app, if you don’t already have one. Inside it, create a file called testimonials.tsx and paste in the code.
my-website/
├── app/
│   ├── layout.tsx
│   └── page.tsx            ← 2. use <Testimonials /> here
├── components/
│   └── testimonials.tsx    ← 1. paste the snippet here
└── package.json
Using JavaScript instead of TypeScript? Name the file testimonials.jsx and change useRef<HTMLDivElement>(null) to useRef(null).
Step 6: Put the reviews on a page
Open the page where you want the reviews to appear. For your homepage, that’s app/page.tsx. Add two things:
- The import at the top of the file
<Testimonials />where you want the reviews to appear
import { Testimonials } from "@/components/testimonials";

export default function Home() {
  return (
    <main>
      <section>
        <h1>Websites and apps that clients love</h1>
        <p>A small design and development studio.</p>
      </section>

      <section>
        <h2>What our clients say</h2>
        <Testimonials />
      </section>
    </main>
  );
}
Your page can stay a server component. You don’t need to add "use client" to it, because the Testimonials component already handles that.
If the @/ import gives you a “Module not found” error, your project doesn’t have that shortcut set up. Use a relative path instead:
import { Testimonials } from "../components/testimonials";Step 7: Run your site and check it
Start your development server as usual:
npm run devOpen http://localhost:3000 and scroll to the section where you added the component. Your reviews should appear within a second or two, looking the same as the live preview in your dashboard.
As a quick test, click to another page on your site and then back again. The reviews should still be there.
Step 8: Deploy
Commit and push as you normally would, whether you use Vercel, Netlify or your own server. There’s nothing to configure: no environment variables, no domain allow-list and no build settings. Once the deploy finishes, your reviews are live.
From now on, putting a new review on your site takes one click: turn on Approved in your dashboard.
Common variations
The same reviews on several pages
Import <Testimonials /> into each page where you want it. You only create the component file once.
Different widgets on different pages
Say you want a carousel on your homepage and a single quote on your pricing page. Create a second widget in the dashboard, then make the component accept the widget ID as a prop:
"use client";

import { useEffect, useRef } from "react";

export function ReviewWidget({ widgetId }: { widgetId: string }) {
  const ref = useRef<HTMLDivElement>(null);

  useEffect(() => {
    const container = ref.current;
    if (!container || container.dataset.loaded) return;
    container.dataset.loaded = "true";

    const script = document.createElement("script");
    script.src = "https://reviewee.live/widget.js";
    script.dataset.widget = widgetId;
    script.async = true;
    document.body.appendChild(script);
  }, [widgetId]);

  return <div id={`testimonial-widget-${widgetId}`} ref={ref} />;
}<ReviewWidget widgetId="homepage-widget-id" />
<ReviewWidget widgetId="pricing-widget-id" />You can use two different widgets on the same page. Each one gets its own container automatically. Just don’t put the same widget twice on one page.
Dark mode that follows your site
Set the widget’s theme to Auto. It picks up a dark or light class on your <html> element, which is what next-themes and Tailwind use, or a data-theme attribute. It updates the moment a visitor toggles your theme. If your site uses a different attribute, add one line inside the useEffect, before appendChild:
script.dataset.themeAttribute = "data-color-mode";Pages Router
The same component works. Put it in components/ and use <Testimonials /> inside any file in pages/. The "use client" line is simply ignored there.
No code at all
If you can’t edit your site right now, open the Hosted page tab on your widget and publish it. You’ll get a public reviews page you can link from your site’s menu, your proposals or your email signature.
Troubleshooting
Nothing shows up at all
- Check that at least one review is switched to Approved (step 1).
- If you turned on Featured reviews only or set a Minimum rating, make sure at least one approved review matches those settings.
- Make sure
<Testimonials />is actually on the page you’re looking at, not just imported. - Open your browser’s developer tools (right-click → Inspect → Console) and look for messages starting with
[Testimonials]. They explain what went wrong.
“Missing data-widget attribute”
The WIDGET_ID in your component is empty or was edited by mistake. Copy the code again from Embed → Next.js.
“Container is already in use by another widget”
The same widget is on the page twice, for example once in layout.tsx and again in page.tsx. Remove one of them, or create a second widget for the second spot.
Reviews disappear after clicking to another page and back
You’re probably using an older version of our Next.js snippet, which used next/script. Next.js only runs a script like that once per visit, so the widget doesn’t load again when a visitor comes back to the page. Replace the file with the current code from step 4 and the problem goes away.
My site blocks the script (Content Security Policy)
If your site sets a Content Security Policy, add https://reviewee.live to both script-src and connect-src.
That’s it
One component file and one line on your page. After that, you manage your reviews in Reviewee, and your website stays up to date without any more code.
No reviews to show yet? Start with how to get your first client reviews.
Every project, one review link
Create a secure link per client, send it when the work wraps, and see at a glance who still owes you a review. Free plan, no credit card required.
Keep reading
- Where to put client reviews on a small business websiteA testimonials page nobody visits doesn’t sell anything. Six places on your site — and off it — where a client review actually changes a decision, and what each review should show when it gets there.
- Your portfolio shows the work. Reviews show what you’re like to hire.Prospects can judge your skill from a portfolio. What they can’t see is the risk of hiring you — and that’s the question a good testimonial answers. Here’s what makes one persuasive, and how to ask for it.
- How to get your first client reviews (without faking a single one)No reviews means fewer clients, and fewer clients means no reviews. A practical way out of the loop for new freelancers and small businesses — and the shortcuts that will cost you more than they save.